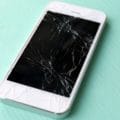
If you are the proud owner of a Samsung Note 20, you know that you have something special in your hands. The Note 20 is perfect for business or personal use with its large screen and powerful processor. But what happens if your screen breaks? Don’t worry – we have you covered! In this post, we will provide a step-by-step guide on how to replace your Samsung Note 20 screen. We have also mentioned some tips on preventing damage to your screen in the future. Stay safe and keep reading!
Use this guide as your ultimate replacement guide because we have everything you need to know about replacing the screen of your Samsung Note 20.
First, you need to purchase a new screen. You can either buy one from Samsung or a third-party retailer. If you are buying from Samsung, ensure that you get the correct model number for your phone. To find this information go to the settings menu of your phone. Once you have the new screen, it’s time to replace the old one.
Turn off your Samsung Note 20 and remove the SIM card tray. It is the very first step that you should never forget, as this could save you from damaging the inside of your phone. The second important thing you should know is that the fingerprint sensor is embedded in this phone’s screen. You will need to be extra careful when replacing the screen. Ensure not to damage the sensor when you remove the old screen or to install the new one.
Be mindful that the screen is most likely to break during this replacement, so apply ample heat if you want to reuse your screen. This way, you can have an 80% chance of not breaking the screen.
Here is a list of all the necessary tools that you might want during the replacement process:
Note: You can get the same set of tools or get the ones available at your convenience.
- Heating Pad
- Suction handle
- Opening Picks
- Spudger
- Tweezers
- Phillip #00 Screwdriver
- Isopropyl Alcohol
Step 1: Heat The Rear Cover
Before beginning disassembly, it is important to power off your phone completely. It will help ensure that you don’t damage any internal components.
You can use a heat gun, hairdryer, or oven to heat the rear cover. Keep the temperature below 200 degrees Fahrenheit, as anything higher could damage your screen.
Using a heat gun, hairdryer, or oven, heat the phone’s rear cover until it is warm to the touch.
Step 2: Insert An Opening Pick
Place a suction cup as close as possible to the heated edge of the rear cover.
It may be possible for the suction cup to adhere to your back glass if it is covered with clear packing tape. An alternative to the suction cup would be to use very strong tape. You can also superglue the suction cup to the broken panel if all else fails.
Using a firm, steady grip, pull up on the suction cup to form a gap between the rear cover and the frame.
It may not be easy, depending on the age of your phone. Applying more heat to the edge may be necessary if you are experiencing difficulties.
Insert the pick in the gap with an opening pick.
You should not insert the opening pick more than 5 millimetres into the phone, or you will damage its internal components.
Step 3: Start To Cut The Adhesive
Slide the opening pick along the left edge and towards the bottom left corner until you completely cut through the adhesive.
To prevent the adhesive from resealing, leave a pick in the bottom left corner.
Step 4: Cut Around The Perimeter Of The Rear Cover.
Don’t insert the opening pick deeper than 5 mm into the phone while cutting through the adhesive. Otherwise, you may damage the internal components.
Continue heating and cutting the adhesive along the remaining three sides of the rear cover.
The opening picks left in each corner can be inserted into the gaps created by the remaining opening picks.
Ensure that you leave an opening pick in each corner to prevent the adhesive from resealing.
Slide an opening pick around the entire perimeter of the phone to dislodge any adhesive that has been missed. If any adhesive remains stubborn, re-heat it.
Step 5: Removing The Rear Cover
Raise the rear cover straight up to remove it.
Step 6: Disconnect The Wireless Charging Coil
With the pointed end of a spudger, pry up the wireless charging coil press connector.
Be careful not to damage the socket or surrounding components by prying under the connector’s edge.
For reattaching press connectors such as this one:
- Align the connector carefully and press down on one side until it clicks into place.
- Repeat the process on the other side.
- Avoid pressuring the center of the connector. It is possible that the pins of a connector can bend if it is misaligned, causing permanent damage.
Step 7: Disconnect The White Press Connector
To remove the white press connector, find the bottom right corner of the motherboard shield, use Spudger pointed end of a spudger to pry it up and remove it.
Step 8: Remove The Motherboard Shield Screws
To remove the motherboard shield, use a Phillips screwdriver to remove the six 4.0 mm screws.
These screws have been thread locked, and they may be difficult to remove if they have not been removed before.
Keep a record of each screw as you complete this repair and make sure that it is returned to the original location.
Step 9: Remove The Wireless Charging Coil
Take off the motherboard shield with a pair of tweezers.
It would help if you were careful when handling the motherboard shield because its edges are thin and sharp.
It would help if you used your fingers to grasp the motherboard shield.
Step 10: Disconnect The Battery
Remove the wireless charging coil by peeling it up and away from the device.
A light adhesive is used to secure the wireless charging coil to the device.
Step 11: Remove The Loudspeaker Screws
To safely disconnect the battery, pry up the battery press connector with the pointed end of the spudger before continuing with the repair.
Step 12: Loosen The Loudspeaker
Remove the five 4.0 mm screws that hold the loudspeaker to the frame with a Phillips screwdriver.
Step 13: Remove The Loudspeaker
On the left side of the loudspeaker, insert the pointed end of a spudger into the triangle-marked hole.
Prying up and loosening the left side of the loudspeaker should be accomplished using a spudger.
Step 14: Disconnect The Display Cable
On the right side of the loudspeaker, insert the pointed end of a spudger into the triangle-shaped hole.
Using the spudger, pry up and remove the loudspeaker from the frame.
There are clips along the bottom edge of the loudspeaker which secure it to the frame.
Step 15: Disconnect The Touch Layer Cable
Lift the loudspeaker with a pair of tweezers and remove it.
Step 16: Adhesive Information
Disconnect the display cable from the motherboard using the pointed end of a spudger.
Step 17: Loosen The Adhesive
Connect the touch layer cable connector to the motherboard using the pointed end of a spudger.
Step 18: Separate The Perimeter Adhesive
In order to remove the screen, you must weaken and cut through the adhesive holding the perimeter of the screen to the frame.
In addition to the adhesive around the camera and fingerprint sensor, there is additional tape on the sides.
It may damage internal components if opening picks are inserted beyond the adhesive.
Step 19: Loosen The Inner Adhesive
You should heat the top of the screen for two minutes.
In order for the heat pad to remain warm, it should be heated properly for at least 10 minutes. The heat pad should not be re-heated more than necessary.
You may also use a hairdryer, heat gun, or hot plate, but be careful not to overheat the phone, which can cause damage to the screen and internal battery.
Make sure that the right edge of the phone is facing upwards.
Apply isopropyl alcohol in the gap between the right edge of the screen and the frame in order to weaken the inner adhesive near the fingerprint sensor.
To prevent damage to the fingerprint sensor, insert the isopropyl alcohol applicator near the top of the inner adhesive area.
If required, you may use the isopropyl alcohol without inserting the applicator into the phone.
The isopropyl alcohol must flow toward the inner adhesive as the phone is tilted.
Allow the alcohol to weaken the adhesive for two minutes.
Step 20: Remove The Screen
Do not attempt to remove the screen completely yet. The screen frame still contains two cables.
In order to thread the touch layer cable through the cut-out in the top half of the frame, hold the top half of the frame-up for better execution.
As you lift the screen by its top half, thread the touch layer cable through the frame’s cut-out.
Do not lift the screen higher than a 30-degree angle above the frame to avoid damaging the display cable.
If the screen does not readily separate from the frame, you need to cut through more of the perimeter adhesive or apply additional isopropyl alcohol to the inner adhesive.
Conclusion
Now, if you want to replace the new screen, follow these steps in reverse. Make sure not to use the isopropyl because you need the adhesive to work when you are going to install it.
If you think this replacement guide is hard, try to find a cell phone repair shop near you that can help you with your screen replacement.
If you have any questions related to cell phone screen replacement or any other cell phone-related query, contact us. We are here for your help.
Thank you for reading!
Related posts: